Arduino LED Chaser Circuit – Complete Beginner Guide with Code & Circuit Diagram
The Arduino LED Chaser Circuit is one of the most popular beginner Arduino projects for learning how LEDs can be controlled in sequence using programming. In this project, multiple LEDs turn ON and OFF one after another, creating a beautiful running light effect.
This simple project helps beginners understand Arduino digital output pins, timing functions, LED connections, and basic programming logic. It is widely used in decoration lights, DIY electronics projects, display systems, and beginner robotics projects.
What is an Arduino LED Chaser Circuit?
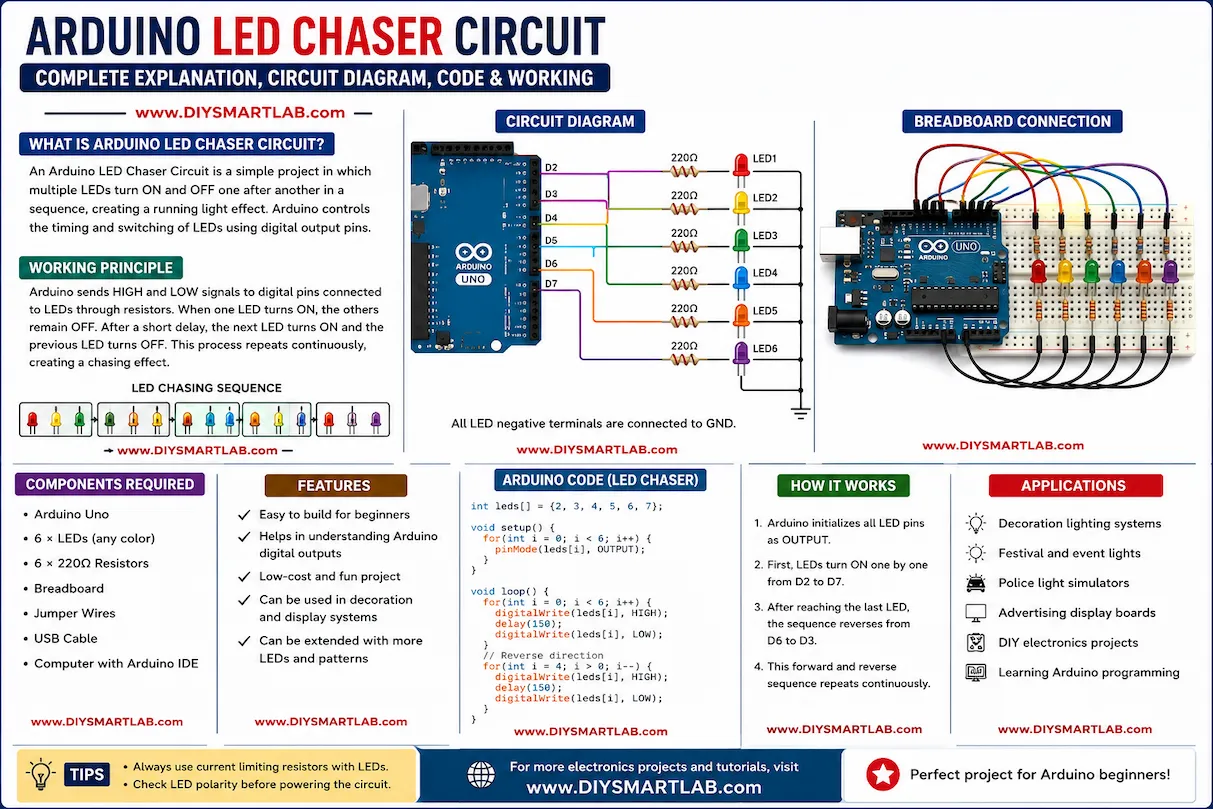
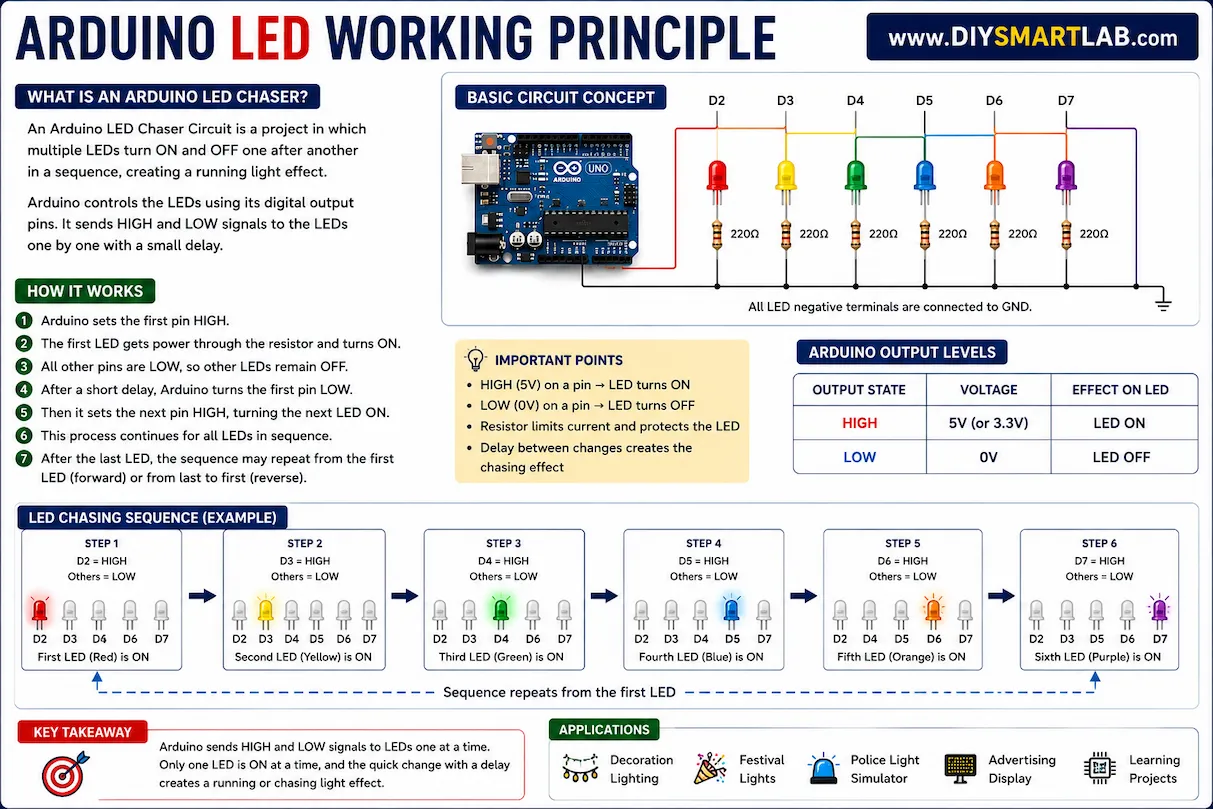
An Arduino LED Chaser Circuit is an electronic project where multiple LEDs glow one after another in a sequence. Arduino controls the timing and switching of LEDs through digital output pins.
The effect looks similar to moving lights used in decoration systems, advertising boards, police light simulations, and festive lighting.
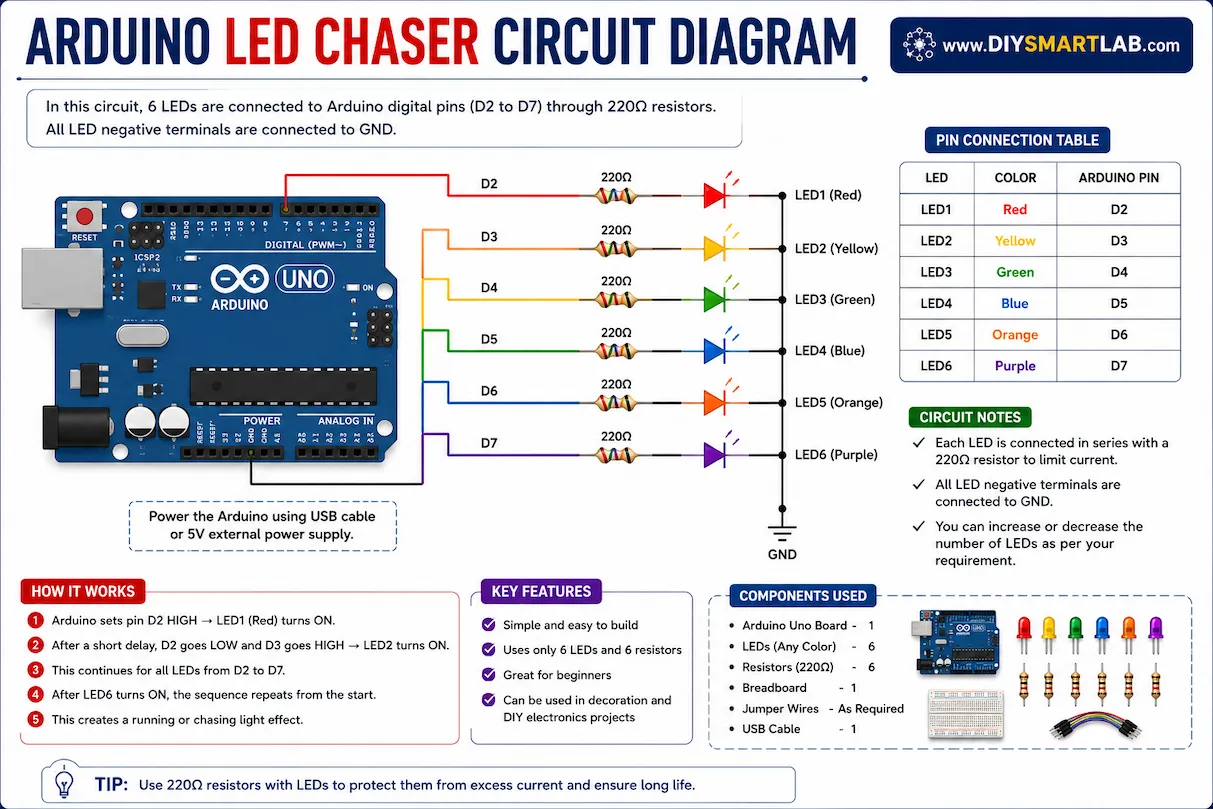
Components Required for Arduino LED Chaser Circuit
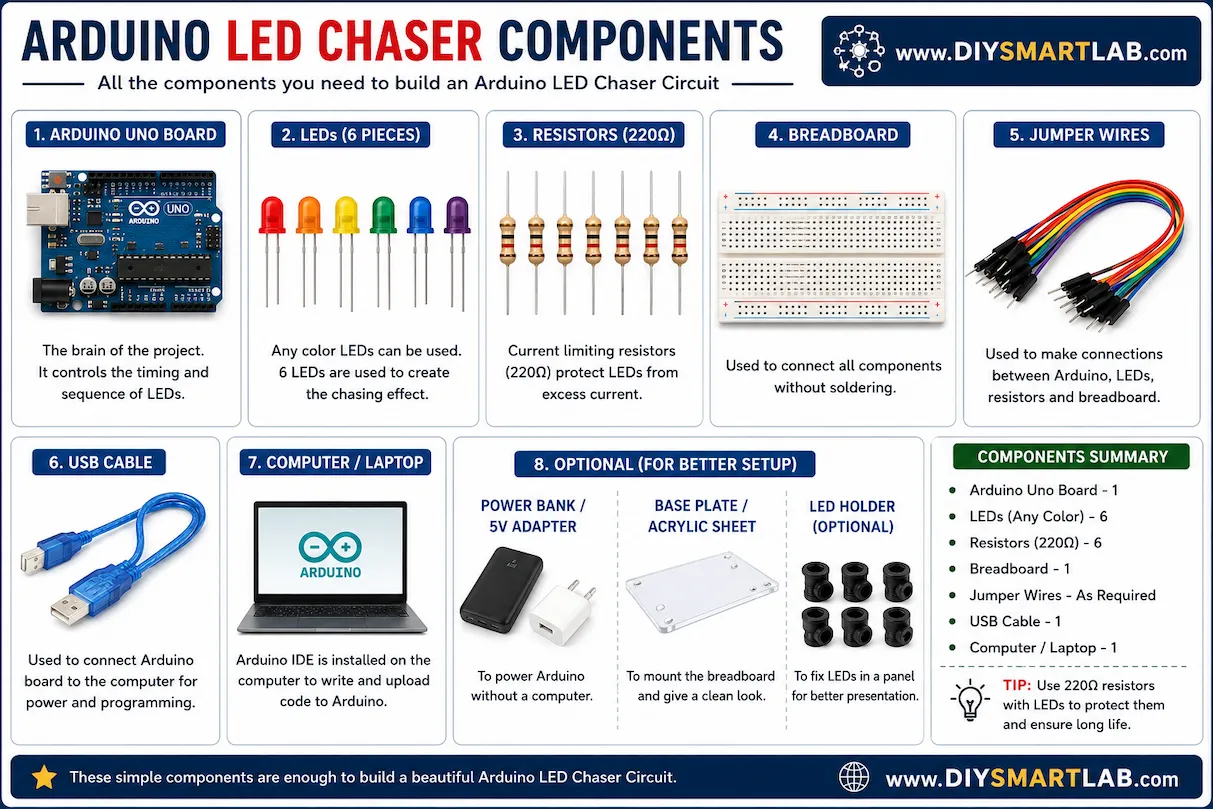
- Arduino Uno Board
- 6 LEDs (any color)
- 6 × 220Ω Resistors
- Breadboard
- Jumper Wires
- USB Cable for Arduino
- Laptop or Computer with Arduino IDE
Arduino LED Chaser Working Principle
The working principle of the LED chaser project is very simple. Arduino sends HIGH and LOW signals to digital pins connected with LEDs.
When one LED turns ON, the others remain OFF. After a small delay, the next LED turns ON and the previous LED turns OFF. This process repeats continuously, creating a running light or chasing effect.
Arduino LED Chaser Circuit Diagram
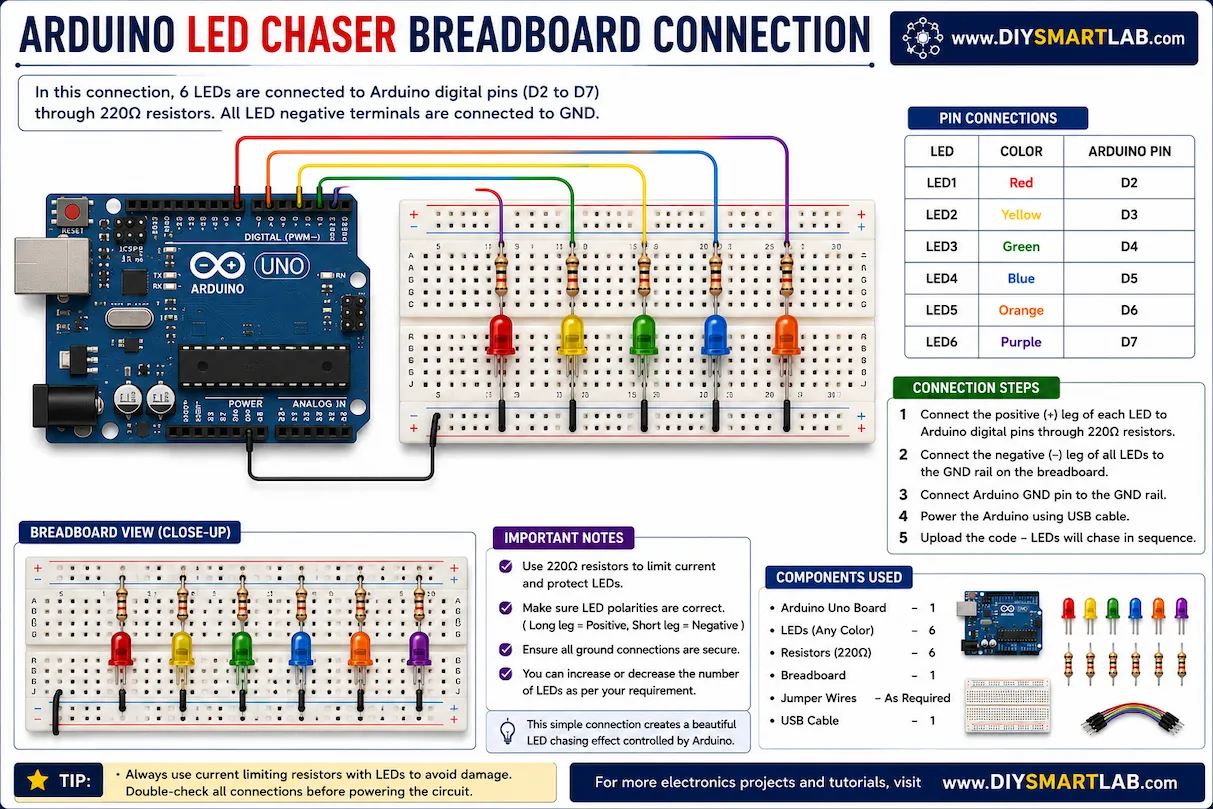
Connect the positive terminal of each LED to Arduino digital pins through 220Ω resistors. Connect all LED negative terminals to the Arduino GND pin.
- LED 1 → Pin 2
- LED 2 → Pin 3
- LED 3 → Pin 4
- LED 4 → Pin 5
- LED 5 → Pin 6
- LED 6 → Pin 7
Arduino LED Chaser Breadboard Connection
Place all LEDs on the breadboard in a straight line. Connect each LED with a resistor to Arduino digital pins. Make sure all negative LED terminals are connected to the common ground rail.
After completing the wiring, connect the Arduino Uno board to your computer using a USB cable.
Arduino LED Chaser Code
int leds[] = {2, 3, 4, 5, 6, 7};

void setup() {
  for(int i = 0; i < 6; i++) {
    pinMode(leds[i], OUTPUT);
  }
}

void loop() {

  for(int i = 0; i < 6; i++) {
    digitalWrite(leds[i], HIGH);
    delay(150);
    digitalWrite(leds[i], LOW);
  }

  for(int i = 4; i > 0; i--) {
    digitalWrite(leds[i], HIGH);
    delay(150);
    digitalWrite(leds[i], LOW);
  }

}
How to Upload the Code to Arduino
- Open Arduino IDE
- Connect Arduino Uno using USB cable
- Select the correct COM Port
- Select Arduino Uno Board
- Copy and paste the code
- Click Upload
- Watch LEDs run in sequence
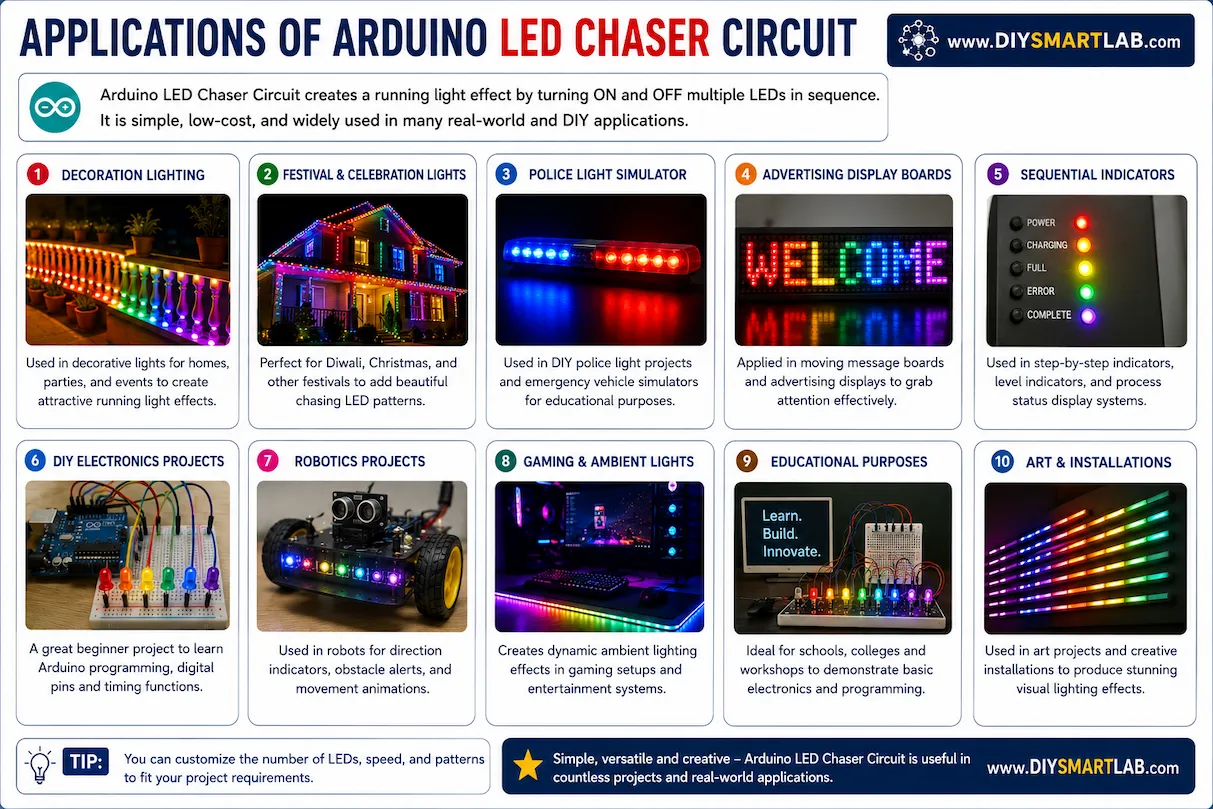
Applications of Arduino LED Chaser Circuit
- Decoration Lighting Systems
- Festival LED Effects
- Police Light Simulators
- DIY Electronics Projects
- Arduino Learning Projects
- Advertising Display Boards
- Sequential Signal Indicators
Advantages of Arduino LED Chaser Project
- Easy to build for beginners
- Low-cost electronics project
- Helps learn Arduino programming
- Improves understanding of digital outputs
- Can be upgraded with sensors and effects
Common Mistakes to Avoid
- Connecting LEDs without resistors
- Wrong LED polarity connection
- Loose breadboard wiring
- Using incorrect Arduino COM port
- Uploading code to wrong board type
Conclusion
The Arduino LED Chaser Circuit is an excellent beginner project for understanding Arduino programming and LED sequencing. It is simple, fun, and highly educational for students, hobbyists, and DIY electronics enthusiasts.
You can further improve this project by adding push buttons, RGB LEDs, Bluetooth modules, or sound sensors for advanced lighting effects.
Frequently Asked Questions (FAQs)
What is an LED chaser circuit?
An LED chaser circuit is a project where LEDs glow one after another in sequence to create a running light effect.
Why are resistors used with LEDs?
Resistors limit current flow and protect LEDs from damage caused by excess current.
Can I use more LEDs in this project?
Yes, you can connect more LEDs if enough Arduino digital pins are available.
Which Arduino board is best for LED chaser projects?
Arduino Uno is the best choice for beginners because it is easy to use and widely supported.
Can I make different LED patterns?
Yes, you can modify the Arduino code to create custom LED patterns and lighting effects.