Traffic Light System Using Arduino | Beginner Arduino Project
Traffic Light System Using Arduino – Beginner Friendly Arduino Project
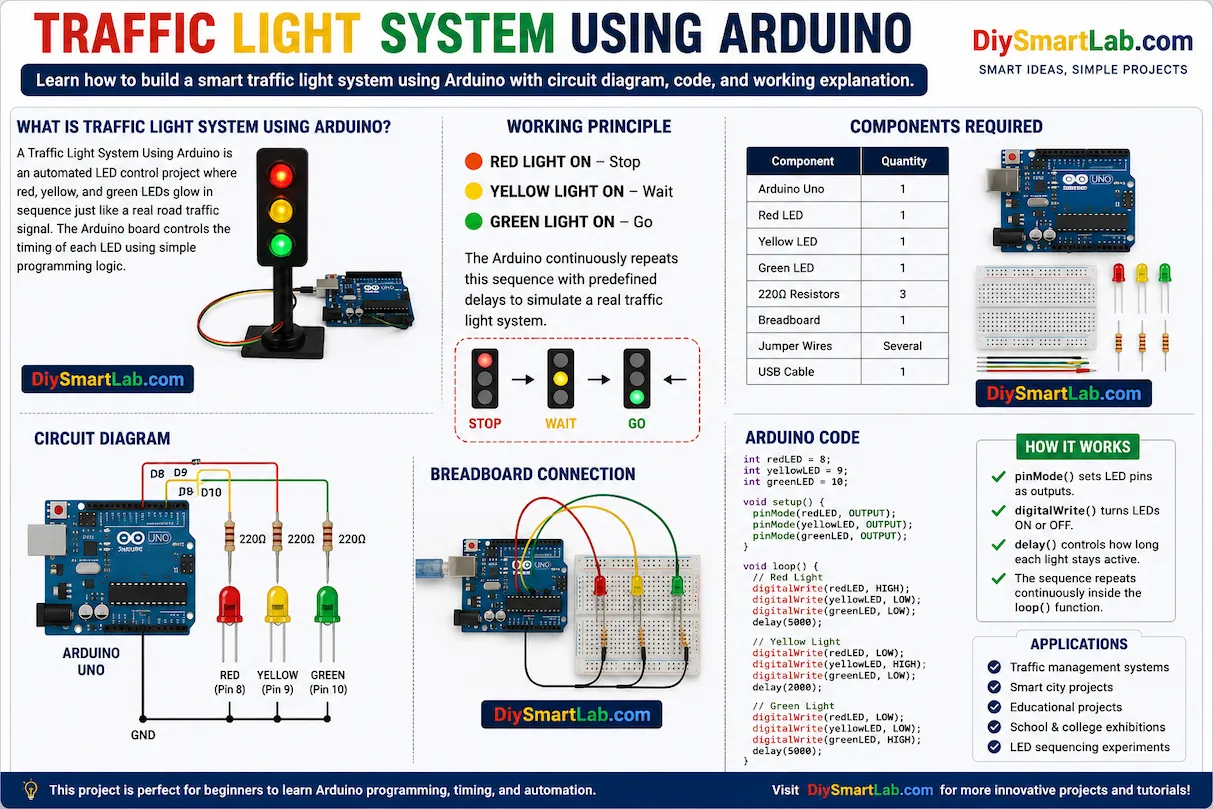
A Traffic Light System Using Arduino is one of the best beginner-friendly electronics and Arduino projects for learning how LEDs, timing, and digital outputs work together. In this project, we will create a simple traffic signal system using an Arduino Uno and three LEDs (Red, Yellow, and Green).
This project is perfect for students, beginners, and DIY electronics enthusiasts who want to understand the basics of Arduino programming and circuit building. You will also learn how real traffic lights operate automatically using timed sequences.
What is a Traffic Light System Using Arduino?
A Traffic Light System Using Arduino is an automated LED control project where red, yellow, and green LEDs glow in sequence just like a real road traffic signal. The Arduino board controls the timing of each LED using simple programming logic.
This project demonstrates:
- Arduino digital output control
- LED sequencing
- Timing functions using
delay() - Basic traffic management logic
- Simple breadboard connections
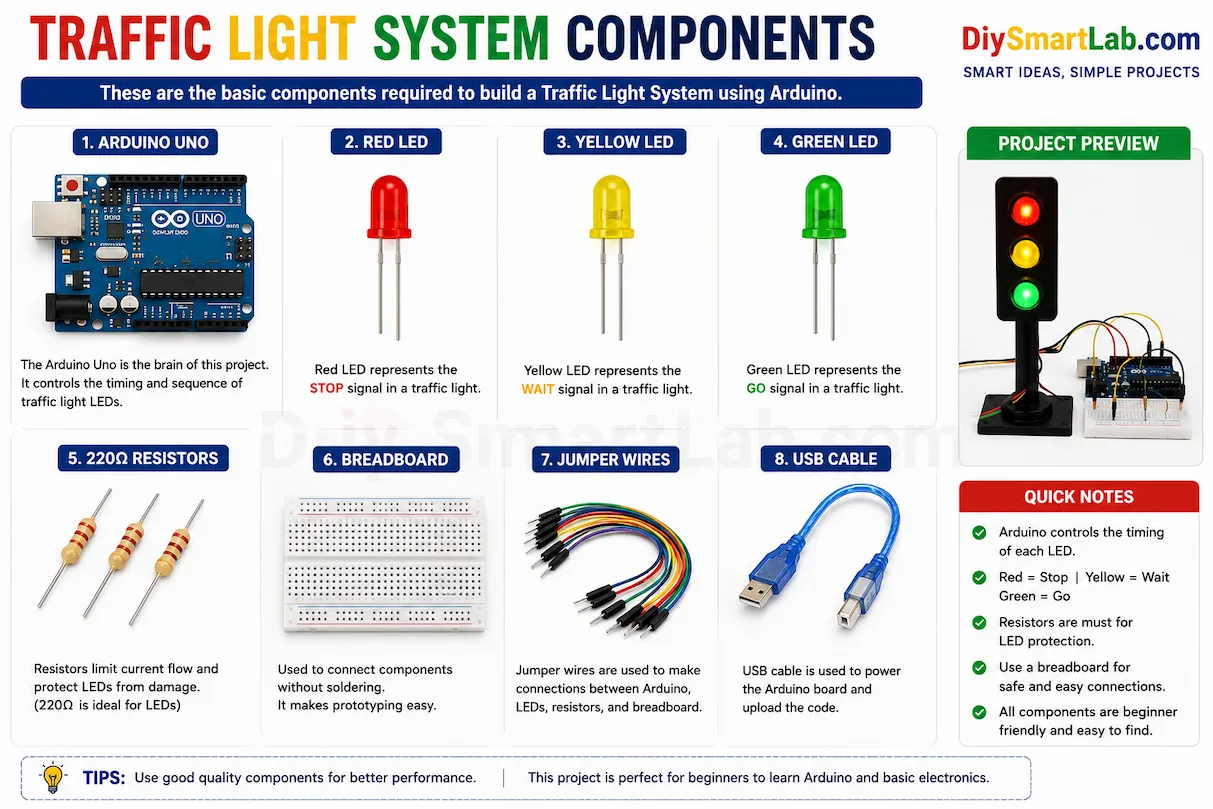
Components Required for Traffic Light System
| Component | Quantity |
|---|---|
| Arduino Uno | 1 |
| Red LED | 1 |
| Yellow LED | 1 |
| Green LED | 1 |
| 220Ω Resistors | 3 |
| Breadboard | 1 |
| Jumper Wires | Several |
| USB Cable | 1 |
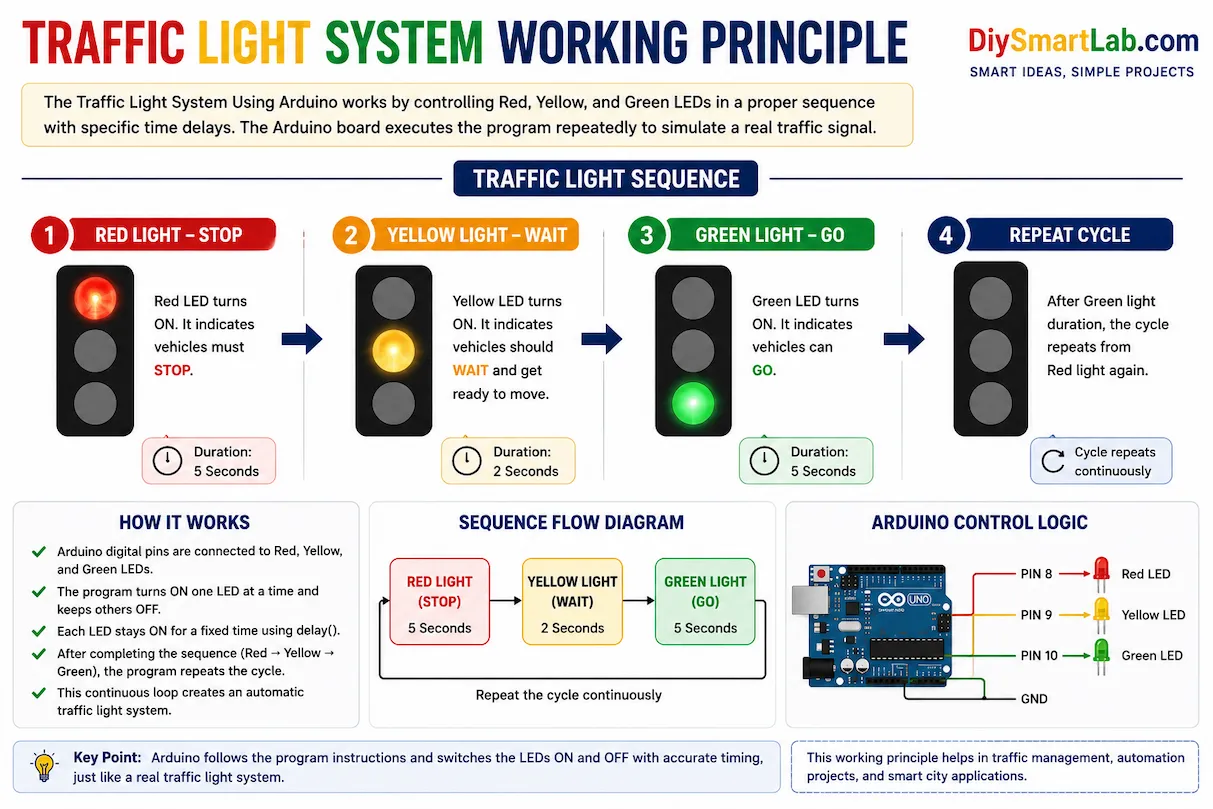
Traffic Light System Working Principle
The Arduino controls three LEDs in a fixed sequence:
- Red LED ON → Stop signal
- Yellow LED ON → Wait signal
- Green LED ON → Go signal
The Arduino program continuously repeats this sequence with predefined delays to simulate a real traffic light system.
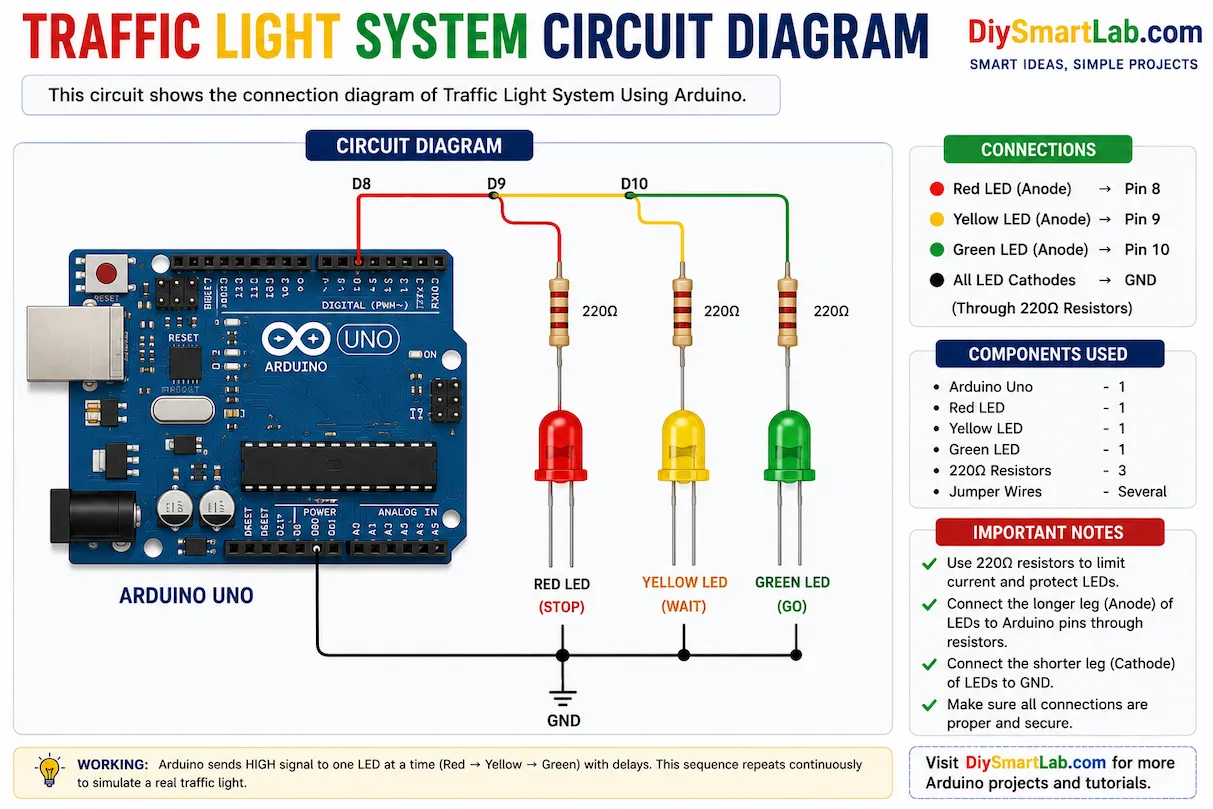
Traffic Light System Circuit Diagram
Connect the LEDs to the Arduino as follows:
- Red LED → Pin 8
- Yellow LED → Pin 9
- Green LED → Pin 10
- All LED negative terminals → GND through 220Ω resistors
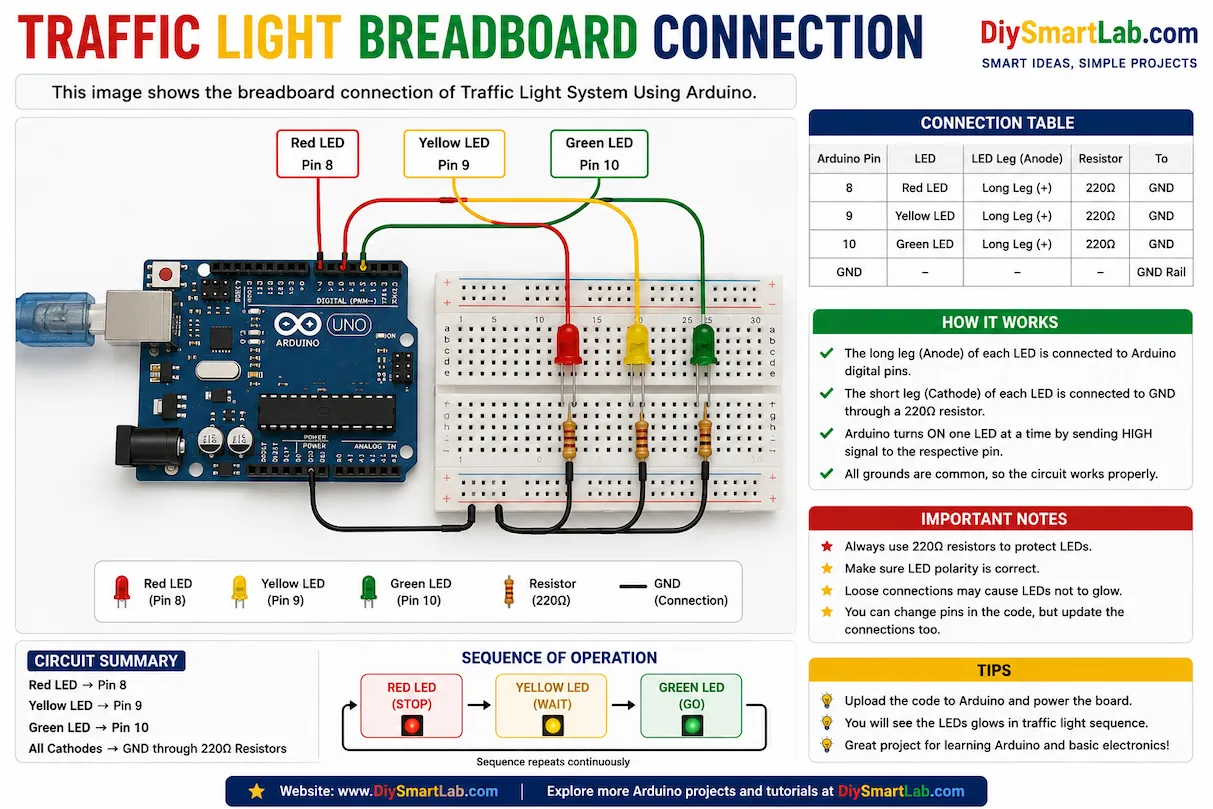
Traffic Light Breadboard Connection
Insert the LEDs on the breadboard and connect them to the Arduino using jumper wires. Make sure each LED has a 220Ω resistor connected in series to protect it from excess current.
The longer LED leg (anode) should connect to the Arduino pins, while the shorter leg (cathode) should connect to GND.
Arduino Code for Traffic Light System
int redLED = 8;
int yellowLED = 9;
int greenLED = 10;

void setup() {
  pinMode(redLED, OUTPUT);
  pinMode(yellowLED, OUTPUT);
  pinMode(greenLED, OUTPUT);
}

void loop() {

  // Red Light
  digitalWrite(redLED, HIGH);
  digitalWrite(yellowLED, LOW);
  digitalWrite(greenLED, LOW);
  delay(5000);

  // Yellow Light
  digitalWrite(redLED, LOW);
  digitalWrite(yellowLED, HIGH);
  digitalWrite(greenLED, LOW);
  delay(2000);

  // Green Light
  digitalWrite(redLED, LOW);
  digitalWrite(yellowLED, LOW);
  digitalWrite(greenLED, HIGH);
  delay(5000);
}
How the Arduino Code Works
pinMode()sets LED pins as outputs.digitalWrite()turns LEDs ON or OFF.delay()controls how long each light stays active.- The sequence repeats continuously inside the
loop()function.
Applications of Traffic Light System Using Arduino
- Educational Arduino projects
- School and college electronics demonstrations
- Traffic management system simulation
- Smart city prototype projects
- Automation learning projects
- LED sequencing experiments
Advantages of This Arduino Traffic Light Project
- Easy to build for beginners
- Low-cost components
- Helps understand Arduino programming basics
- Simple breadboard wiring
- Great project for learning timing and automation
Common Mistakes Beginners Make
- Connecting LEDs without resistors
- Wrong LED polarity connection
- Loose breadboard wiring
- Uploading code to the wrong COM port
- Using incorrect Arduino pin numbers in code
Tips to Improve This Project
- Add a pedestrian crossing button
- Use a buzzer for sound indication
- Add an LCD display for countdown timer
- Create a 4-way traffic junction system
- Use sensors for smart traffic control
Conclusion
The Traffic Light System Using Arduino is an excellent beginner project for learning Arduino programming, LED control, and automation basics. It teaches how digital outputs work and helps build confidence in creating real-world electronics projects.
If you are new to Arduino, this project is a perfect starting point before moving to advanced automation and smart city projects.
Frequently Asked Questions (FAQs)
Which Arduino board is best for this project?
Arduino Uno is the best choice for beginners because it is simple, affordable, and widely supported.
Why are resistors used with LEDs?
Resistors limit current flow and protect LEDs from damage.
Can I add more traffic signals?
Yes, you can expand the project by adding more LEDs and modifying the Arduino code.
Can this project work without a breadboard?
Yes, you can directly connect components using jumper wires, but a breadboard makes wiring easier and cleaner.
Is this project suitable for school exhibitions?
Yes, this is one of the most popular Arduino projects for school and college exhibitions.