What is a Breadboard? How to Use It Properly | Beginner Guide
What is a Breadboard? How to Use It Properly
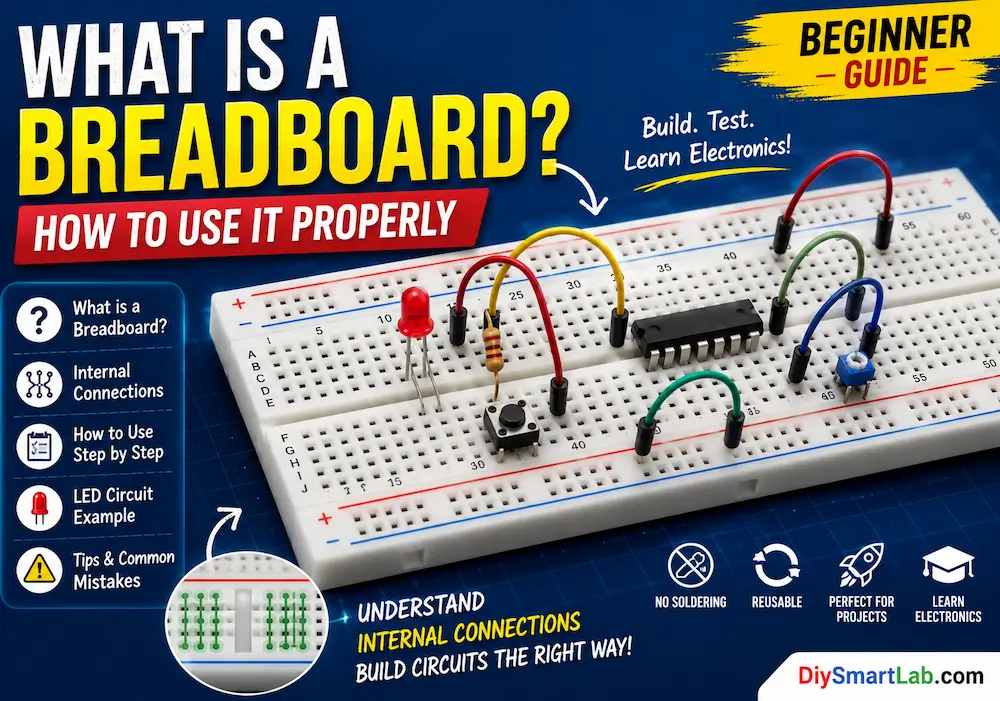
A breadboard is one of the most useful tools for beginners in electronics. It allows you to build and test circuits without soldering. Whether you are working with LEDs, resistors, sensors, ICs, or Arduino projects, a breadboard helps you quickly connect components and experiment safely.
In this guide, you will learn what a breadboard is, how it works internally, how to use it properly, and common mistakes beginners should avoid.

What is a Breadboard?
A breadboard is a reusable plastic board with many tiny holes used to connect electronic components temporarily. Inside the breadboard, metal strips connect specific holes together. This makes it easy to build circuits without using solder.
Breadboards are mostly used for:
- Testing electronic circuits
- Arduino and microcontroller projects
- Learning basic electronics
- Prototyping before PCB design
- Connecting sensors, LEDs, ICs, and modules
Why is it Called a Breadboard?
In the early days of electronics, people used wooden boards, sometimes actual kitchen breadboards, to mount and connect components. Modern breadboards are plastic and solderless, but the name stayed the same.
Main Parts of a Breadboard
A typical solderless breadboard has three main sections:
| Part | Purpose |
|---|---|
| Terminal Strips | Main area where components are inserted |
| Power Rails | Used for positive and negative power supply lines |
| Center Gap | Separates two sides and allows ICs to be placed safely |
How Does a Breadboard Work?
The holes on a breadboard are connected internally using metal clips. When you insert a component lead or jumper wire into a hole, it touches the metal clip and becomes electrically connected to other holes in the same row or rail.
Internal Connection of Breadboard
In the main terminal area, holes are usually connected in groups of five. For example, holes A, B, C, D, and E in the same row are connected together. Similarly, holes F, G, H, I, and J on the other side are connected together.
The center gap separates both sides, so components like ICs can be placed across the gap without shorting their pins.

Breadboard Power Rails
The long lines on the sides of the breadboard are called power rails. These are usually marked with red and blue lines.
- Red rail: Used for positive voltage, such as 5V or 3.3V
- Blue or black rail: Used for ground or negative terminal
Power rails make it easy to distribute power to different parts of your circuit.
How to Use a Breadboard Properly
1. Connect the Power Supply
First, connect your power source to the breadboard power rails. For Arduino projects, connect:
- Arduino 5V pin to the red power rail
- Arduino GND pin to the blue or negative rail
2. Place Components in the Correct Rows
Insert components so their legs are placed in different electrical rows when needed. For example, both legs of an LED should not be placed in the same connected row because that will short the LED.
3. Use Jumper Wires
Jumper wires are used to connect different rows, power rails, sensors, and Arduino pins. Use short and neat wires whenever possible to avoid confusion.
4. Use Resistors Where Required
Many components need resistors for protection. For example, an LED should always be connected with a current-limiting resistor.
5. Check Connections Before Powering On
Before connecting power, carefully check your circuit. Wrong wiring can damage components, sensors, or your Arduino board.
Simple LED Circuit on Breadboard
Here is a basic breadboard circuit example using an LED and resistor:
| Component | Connection |
|---|---|
| Arduino 5V | Positive power rail |
| Arduino GND | Negative power rail |
| LED Anode | Connected to resistor |
| LED Cathode | Connected to GND rail |
| Resistor | Between 5V and LED anode |

Types of Breadboards
| Type | Description | Best For |
|---|---|---|
| Mini Breadboard | Small size with fewer holes | Simple circuits and small projects |
| Half-Size Breadboard | Medium size and easy to carry | Arduino and sensor projects |
| Full-Size Breadboard | Large board with more space | Complex circuits and IC projects |
| Power Breadboard | Includes power supply module support | Prototyping with stable power |
Common Breadboard Mistakes Beginners Make
- Connecting both LED legs in the same row
- Forgetting to connect GND properly
- Using loose jumper wires
- Placing ICs on one side instead of across the center gap
- Applying too much voltage to components
- Ignoring split power rails
- Making messy wiring that is hard to debug
Breadboard Safety Tips
- Always turn off power before changing connections.
- Use proper resistor values with LEDs and sensors.
- Do not use a breadboard for high-voltage AC circuits.
- Avoid overloading breadboard contacts with high current.
- Check polarity of LEDs, capacitors, and power supply before testing.
Advantages of Using a Breadboard
- No soldering required
- Reusable many times
- Beginner-friendly
- Easy to modify circuits
- Perfect for Arduino projects
- Useful for learning electronics
Limitations of a Breadboard
- Not suitable for permanent circuits
- Not good for high-current circuits
- Loose wires can cause connection problems
- Not ideal for high-frequency circuits
- Large circuits can become messy
Breadboard vs PCB
| Feature | Breadboard | PCB |
|---|---|---|
| Connection Type | Temporary | Permanent |
| Soldering | Not required | Required |
| Best For | Testing and prototyping | Final circuits |
| Reusable | Yes | No, usually project-specific |
| Reliability | Medium | High |
Applications of Breadboard
- Arduino projects
- LED circuits
- Sensor testing
- IC experiments
- Basic electronics learning
- Robotics projects
- Smart home prototypes
- DIY electronics testing

Best Practices for Clean Breadboard Wiring
- Use red wires for positive supply
- Use black or blue wires for ground
- Keep jumper wires short
- Place ICs across the center gap
- Connect all ground points together
- Label complex circuits if possible
- Build and test one section at a time
Conclusion
A breadboard is an essential tool for anyone learning electronics or building DIY projects. It makes circuit testing simple, fast, and solder-free. By understanding the internal connections, power rails, and proper wiring methods, you can build circuits more safely and efficiently.
If you are starting with Arduino, sensors, LEDs, or basic electronics, learning how to use a breadboard properly is one of the first and most important skills.
FAQs About Breadboard
What is a breadboard used for?
A breadboard is used to build and test electronic circuits without soldering.
Can I use a breadboard for Arduino projects?
Yes, breadboards are commonly used with Arduino for testing sensors, LEDs, modules, and other components.
Are breadboard connections permanent?
No, breadboard connections are temporary. For permanent circuits, use a PCB or soldered perfboard.
Can I use a breadboard for 220V AC?
No, breadboards should not be used for high-voltage AC circuits. They are mainly suitable for low-voltage DC circuits.
Why is my breadboard circuit not working?
Common reasons include loose wires, wrong row connections, missing ground connection, wrong component polarity, or split power rails.