Arduino LED Blinking Project for Beginners | Simple Arduino Tutorial
Arduino LED Blinking Project for Beginners
The Arduino LED Blinking Project is one of the easiest and most popular beginner projects in electronics and programming. In this tutorial by DiySmartLab.com, you will learn how to blink an LED using an Arduino Uno board with simple wiring and easy-to-understand code.
This project helps beginners understand the basics of Arduino programming, digital output pins, LEDs, and timing functions. If you are new to Arduino, this is the perfect starting project.
What is an Arduino LED Blinking Project?
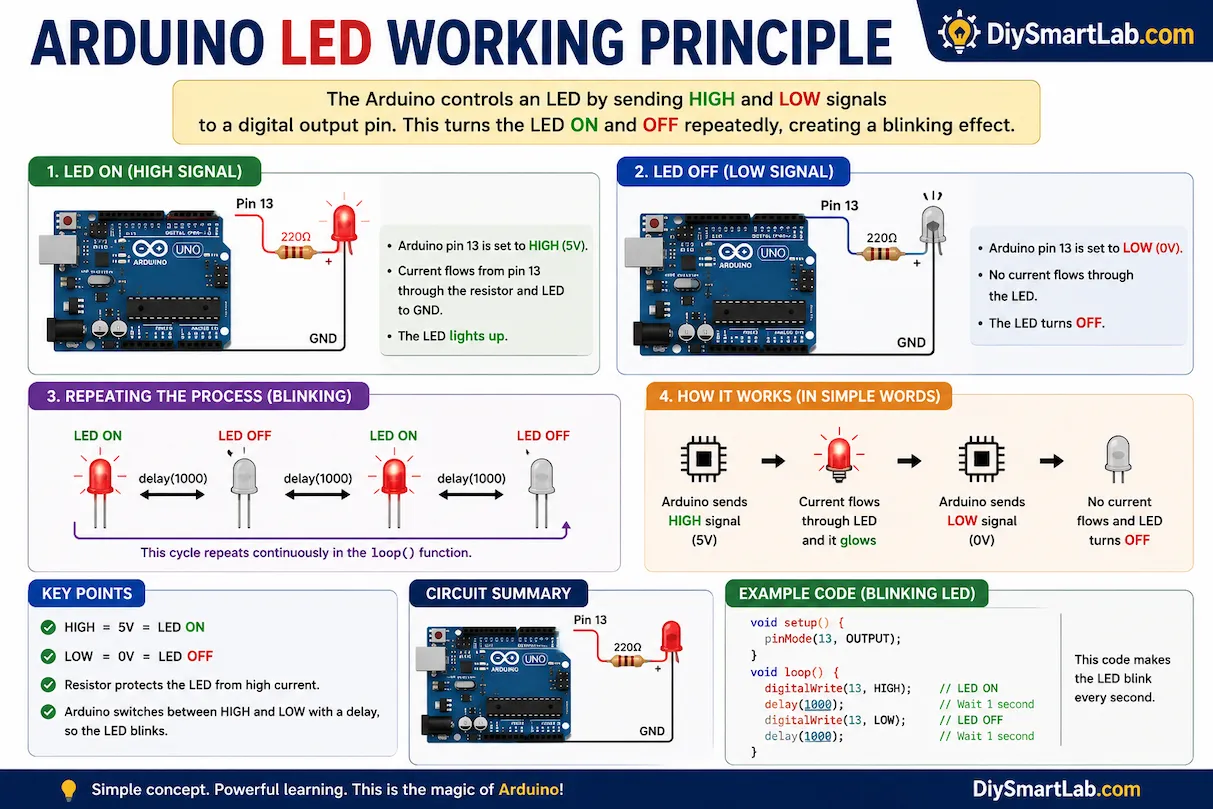
An Arduino LED blinking project is a simple electronics experiment where an LED turns ON and OFF repeatedly using an Arduino board. The Arduino sends HIGH and LOW signals to the LED pin, creating a blinking effect.
This project is commonly used to learn:
- Arduino programming basics
- Digital output control
- LED operation
- Delay timing functions
- Breadboard connections
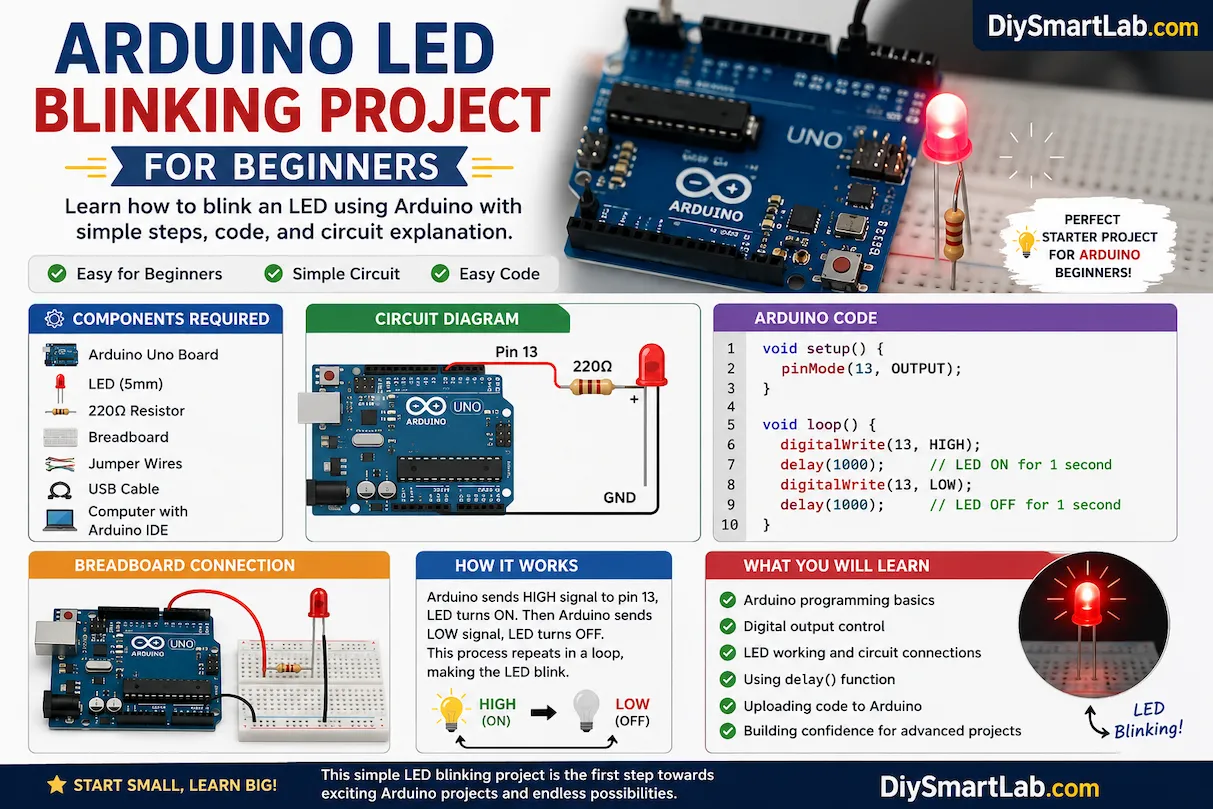
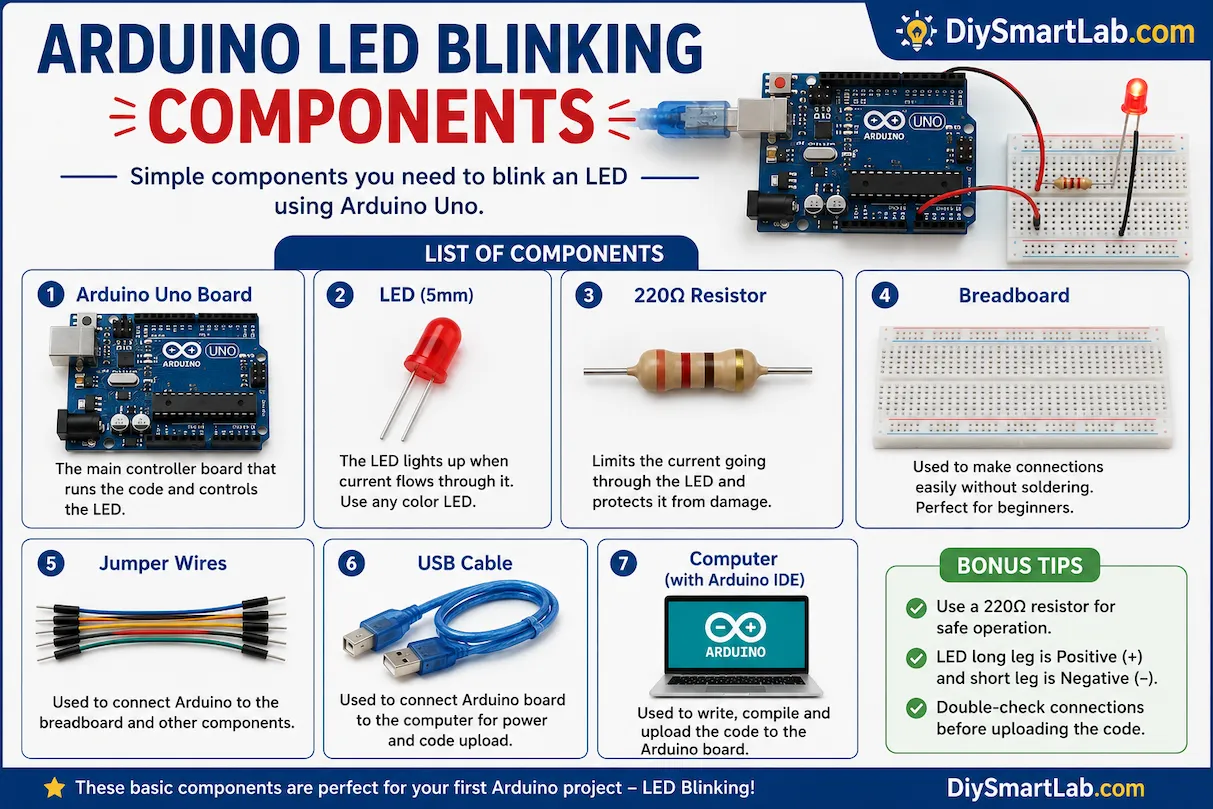
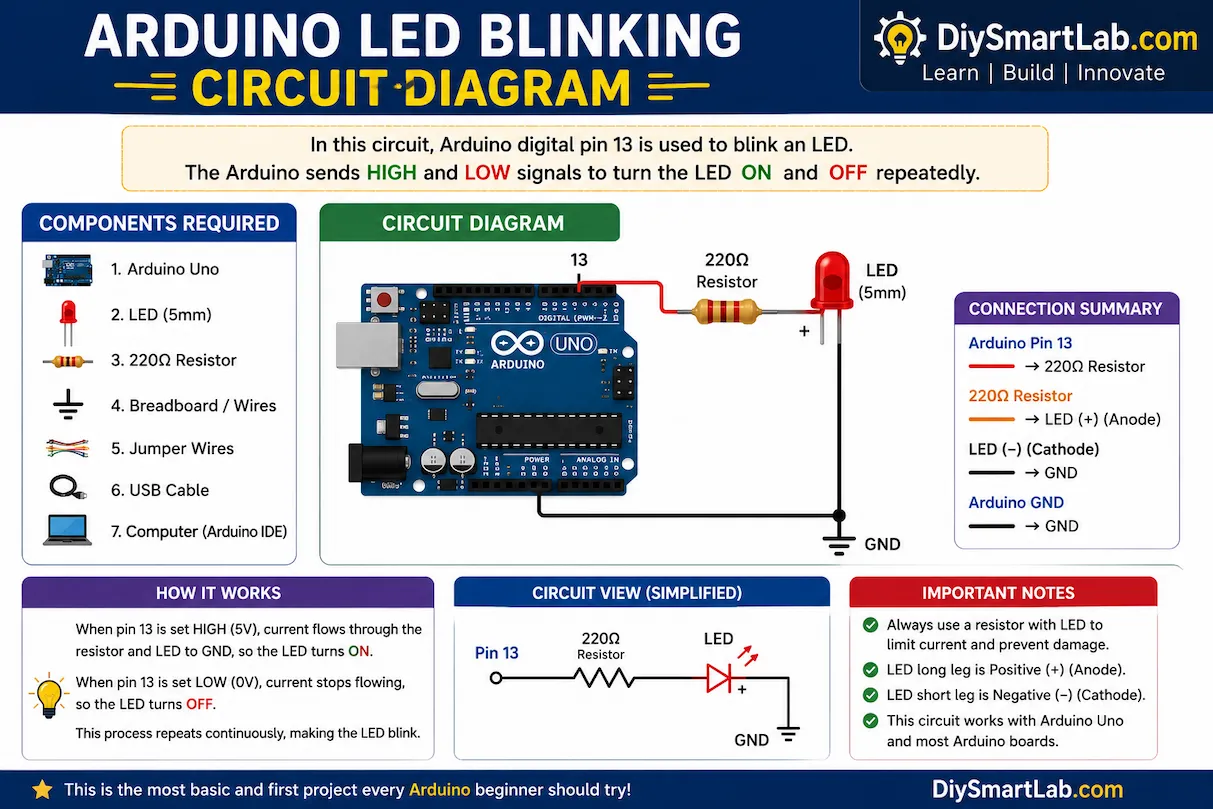
Components Required for Arduino LED Blinking Project
- Arduino Uno Board
- LED (5mm)
- 220Ω Resistor
- Breadboard
- Jumper Wires
- USB Cable
- Computer with Arduino IDE
How LED Blinking Works in Arduino
The Arduino controls the LED through one of its digital output pins. When the pin is set HIGH, current flows through the LED and it turns ON. When the pin is set LOW, current stops flowing and the LED turns OFF.
The Arduino repeatedly switches between HIGH and LOW with a small delay, creating the blinking effect.
Arduino LED Blinking Circuit Diagram
Connect the positive leg (anode) of the LED to Arduino digital pin 13 through a 220Ω resistor. Connect the negative leg (cathode) of the LED to the GND pin of Arduino.
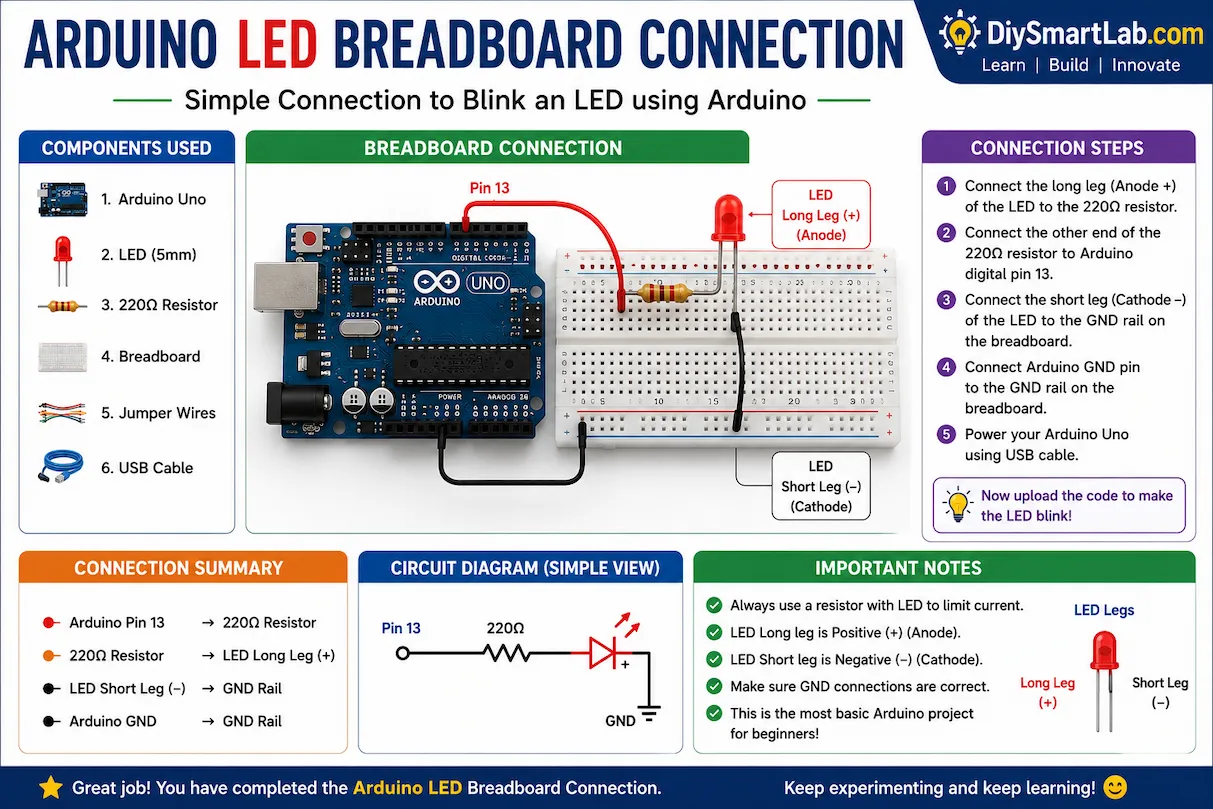
Arduino LED Breadboard Connection
- Connect LED positive leg to resistor
- Connect resistor to Arduino pin 13
- Connect LED negative leg to GND
- Connect Arduino to computer using USB cable
Arduino LED Blinking Code
void setup() {
  pinMode(13, OUTPUT);
}

void loop() {
  digitalWrite(13, HIGH);
  delay(1000);

  digitalWrite(13, LOW);
  delay(1000);
}
Code Explanation
- pinMode(13, OUTPUT); sets pin 13 as output.
- digitalWrite(13, HIGH); turns the LED ON.
- delay(1000); waits for 1 second.
- digitalWrite(13, LOW); turns the LED OFF.
- The loop repeats continuously.
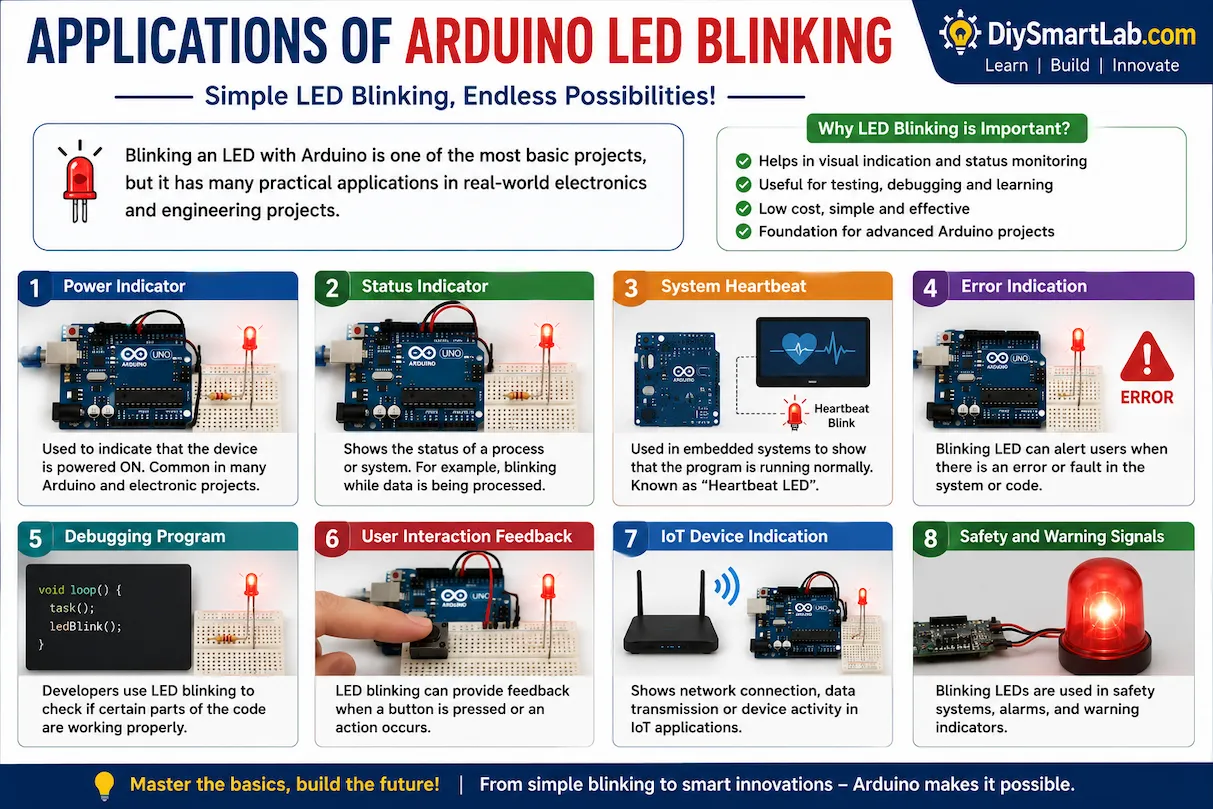
Applications of Arduino LED Blinking Project
- Learning Arduino basics
- Testing digital output pins
- LED indication systems
- Electronic project debugging
- DIY electronics learning projects
- Smart home indicator systems
Common Mistakes Beginners Make
- Connecting LED in reverse polarity
- Not using a resistor with LED
- Uploading code to wrong COM port
- Loose breadboard connections
- Using wrong Arduino board selection in IDE
Tips for Beginners
- Always use a resistor with LED
- Double-check wiring connections
- Use quality jumper wires
- Start with simple projects before advanced circuits
- Experiment with different delay timings
Conclusion
The Arduino LED Blinking Project for Beginners is one of the best ways to start learning electronics and Arduino programming. It teaches the fundamentals of digital output control, coding structure, and circuit building in a simple and practical way.
Once you complete this project, you can move on to advanced Arduino projects like LED chasers, RGB LED control, sensors, and smart home automation systems.
Frequently Asked Questions (FAQs)
Why is my Arduino LED not blinking?
Check your wiring connections, LED polarity, resistor connection, and uploaded code.
Can I blink multiple LEDs with Arduino?
Yes, you can control multiple LEDs using different Arduino digital pins.
Why do we use a resistor with LED?
A resistor limits current and protects the LED from damage.
Which Arduino board is best for beginners?
Arduino Uno is the most beginner-friendly board because of its simple design and large community support.
Can I use the built-in LED on Arduino Uno?
Yes, Arduino Uno already has a built-in LED connected to pin 13 that you can use directly.