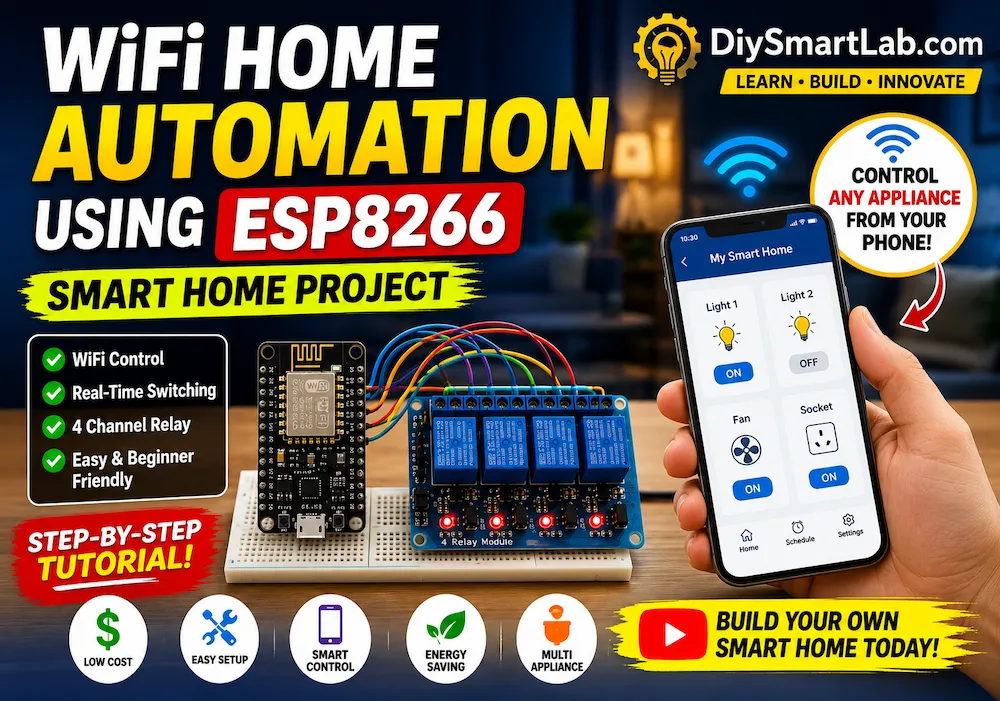
WiFi Home Automation Using ESP8266 – Complete Beginner Guide
WiFi Home Automation Using ESP8266 – Complete Beginner Guide
Smart home technology is becoming increasingly popular because it makes daily life more convenient and efficient. Today, you can control lights, fans, and other electrical appliances directly from your smartphone without touching a physical switch.
One of the easiest and most affordable ways to build a smart home system is by using an ESP8266 microcontroller. Thanks to its built-in WiFi capability, the ESP8266 can connect to your home network and allow wireless control of connected devices.
In this beginner-friendly guide from DiySmartLab.com, you will learn everything about WiFi Home Automation Using ESP8266, including its features, required components, and working principle.
What You Will Learn
- What is WiFi Home Automation Using ESP8266?
- How ESP8266 works in smart home projects
- Features of the automation system
- Components required
- ESP8266 specifications
- Working principle of WiFi home automation
What Is WiFi Home Automation Using ESP8266?
WiFi Home Automation Using ESP8266 is an Internet of Things (IoT) project that allows users to control electrical appliances remotely through a WiFi network.
In this system, the ESP8266 acts as the main controller. It connects to your home WiFi router and receives commands from a smartphone, tablet, or web browser. Based on these commands, it switches appliances ON or OFF using relay modules.
As a result, users can control lights, fans, sockets, and other devices wirelessly from anywhere within the network.
Because of its low cost and ease of implementation, this project is widely used in DIY smart home systems.
Beginner Note:
The ESP8266 contains a built-in WiFi module. Therefore, you do not need any additional WiFi hardware, making the project simpler and more affordable.
Features of WiFi Home Automation Using ESP8266
This project offers several useful features that make it ideal for beginners and smart home enthusiasts.
- Wireless appliance control through WiFi
- Smartphone-based operation
- Real-time device switching
- Low hardware cost
- Easy Arduino IDE programming
- Remote monitoring capability
- Expandable for multiple appliances
- Compact and energy-efficient design
- Supports web server and IoT applications
- User-friendly interface
Why Use ESP8266 for Home Automation?
The ESP8266 has become one of the most popular microcontrollers for IoT and smart home projects.
Unlike traditional microcontrollers, it comes with integrated WiFi support. Therefore, it can directly connect to wireless networks without requiring external modules.
Additionally, it offers excellent performance, low power consumption, and strong community support.
Benefits of ESP8266
- Built-in WiFi connectivity
- Low cost compared to other IoT boards
- Easy programming using Arduino IDE
- Small and compact design
- Reliable wireless communication
- Large online community support
- Perfect for smart home projects
Components Required
Before building the project, gather the following components.
| Component | Quantity | Purpose |
|---|---|---|
| ESP8266 NodeMCU | 1 | Main controller board |
| Relay Module | 1 | Switch electrical appliances |
| Breadboard | 1 | Testing circuit connections |
| Jumper Wires | Several | Making connections |
| USB Cable | 1 | Programming ESP8266 |
| Power Supply | 1 | Power source |
| Light Bulb or Fan | Optional | Load for testing |
ESP8266 NodeMCU Specifications
The ESP8266 is a powerful microcontroller that combines processing capability with wireless networking.
| Specification | Value |
|---|---|
| Operating Voltage | 3.3V |
| WiFi Standard | 802.11 b/g/n |
| Clock Speed | 80 MHz |
| Flash Memory | 4 MB |
| GPIO Pins | Multiple |
| Programming Platform | Arduino IDE |
Working Principle of WiFi Home Automation Using ESP8266
The working principle of this project is simple and easy to understand.
First, the ESP8266 connects to your home WiFi router. At the same time, your smartphone connects to the same network.
When the user presses a control button on the mobile interface, a command is sent through the WiFi network.
The ESP8266 receives this command and processes it immediately.
Next, it activates the corresponding relay channel.
Finally, the connected appliance changes its state and turns ON or OFF.
Simple Workflow:
- Smartphone sends a command.
- WiFi router transfers the command.
- ESP8266 receives the instruction.
- Relay module activates.
- Connected appliance switches ON or OFF.
This communication happens within milliseconds, making the system highly responsive and suitable for real-time smart home control.
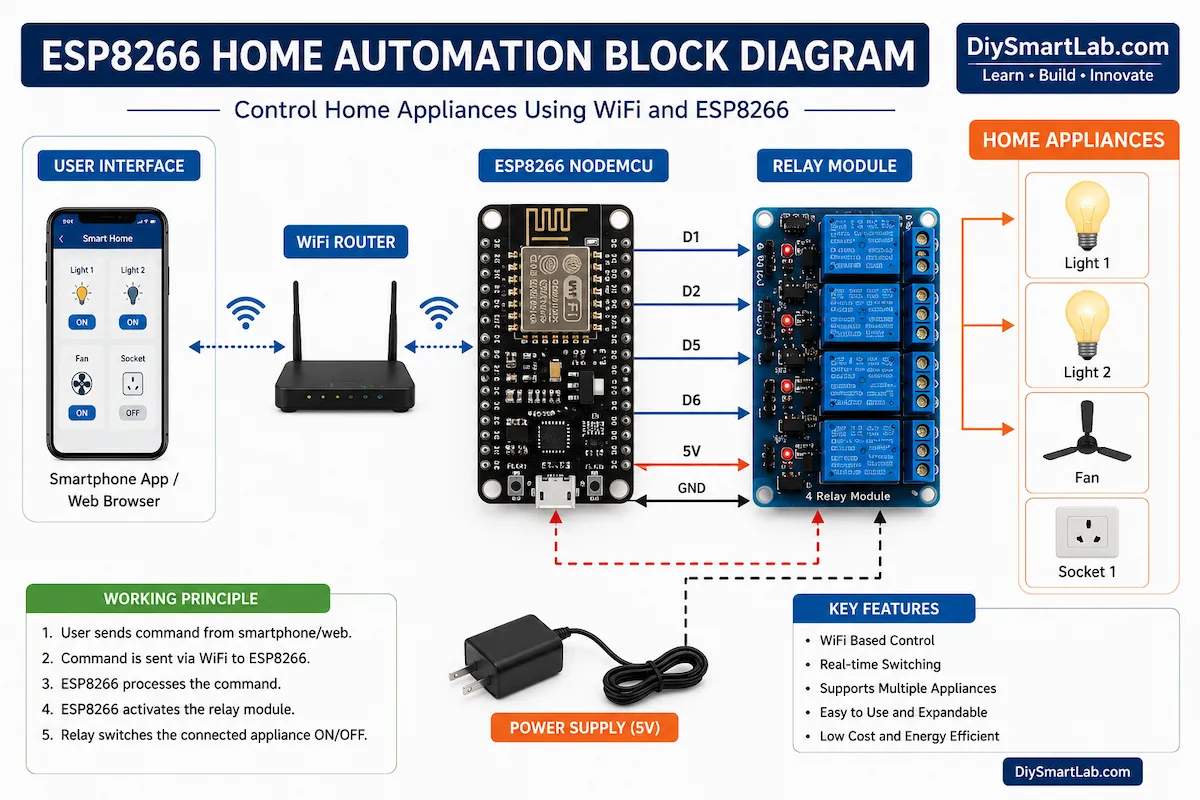
System Architecture of WiFi Home Automation Using ESP8266
Before connecting the hardware, it is important to understand the overall architecture of the system.
The WiFi Home Automation Using ESP8266 project consists of four major sections. Each section performs a specific task to ensure smooth communication between the user and connected appliances.
Main System Components
- Smartphone or Tablet
- WiFi Router
- ESP8266 NodeMCU
- Relay Module
- Electrical Appliances
The smartphone sends commands through the WiFi network. The ESP8266 receives these commands and controls the relay module. Finally, the relay switches the connected appliance ON or OFF.
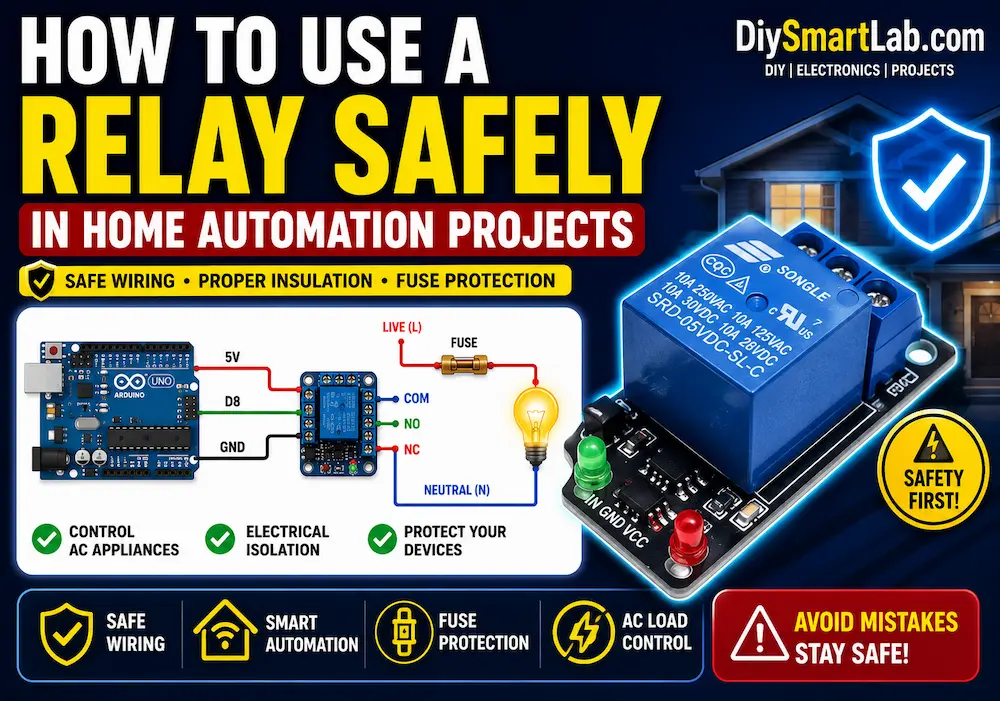
Circuit Diagram Explanation
The circuit is relatively simple because the ESP8266 directly controls the relay module through its GPIO pins.
Each relay channel is connected to a digital output pin on the ESP8266. When the pin changes state, the relay activates and switches the appliance.
The relay module acts as an electrical isolation device between the low-voltage ESP8266 circuit and the high-voltage AC appliance.
Important:
Never connect AC mains voltage directly to the ESP8266. Always use a relay module to safely control high-voltage appliances.
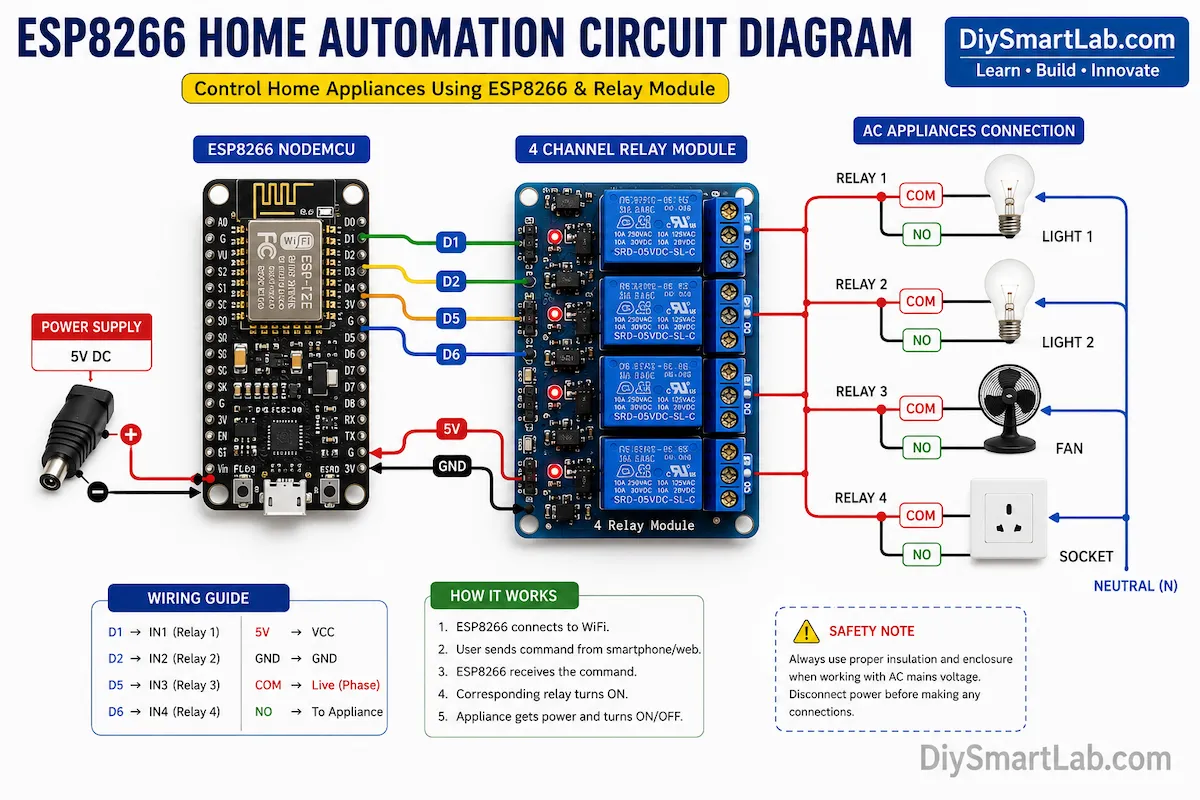
ESP8266 to Relay Module Connections
The following table shows a common wiring configuration for a 4-channel relay module.
| ESP8266 Pin | Relay Pin | Function |
|---|---|---|
| D1 | IN1 | Appliance 1 |
| D2 | IN2 | Appliance 2 |
| D5 | IN3 | Appliance 3 |
| D6 | IN4 | Appliance 4 |
| VIN | VCC | Power |
| GND | GND | Ground |
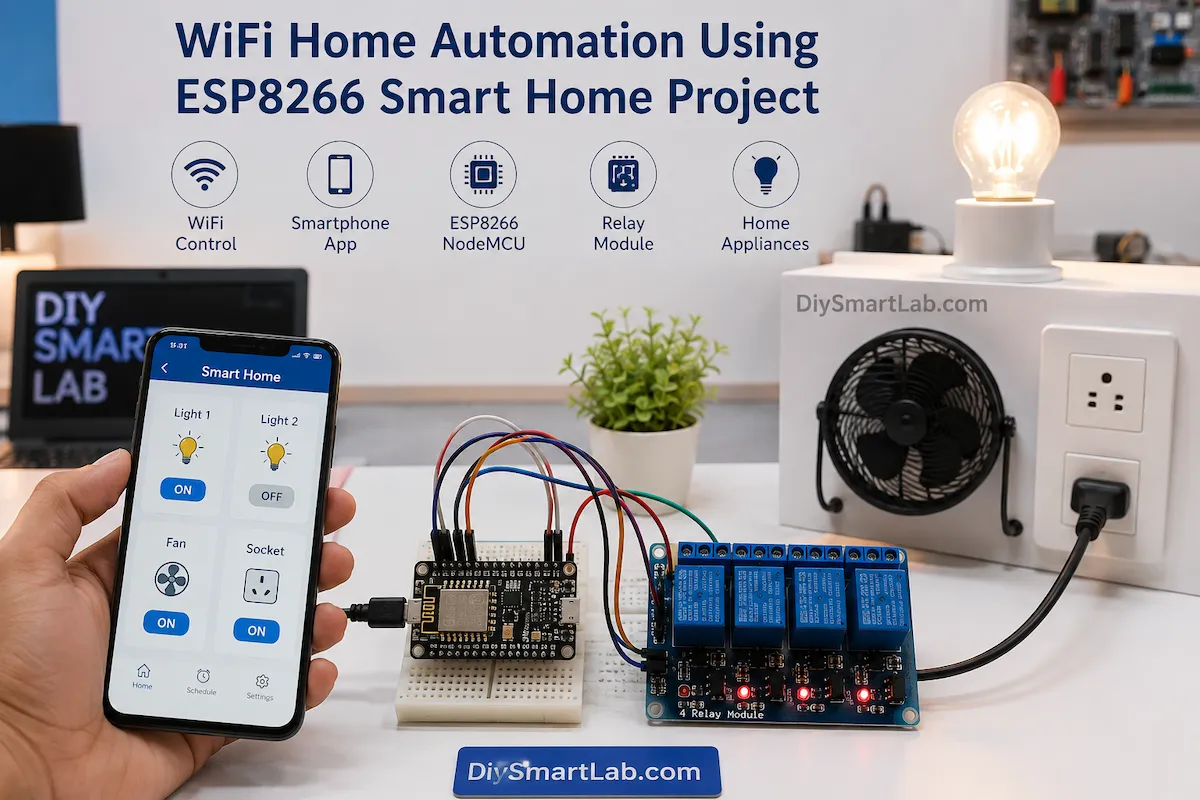
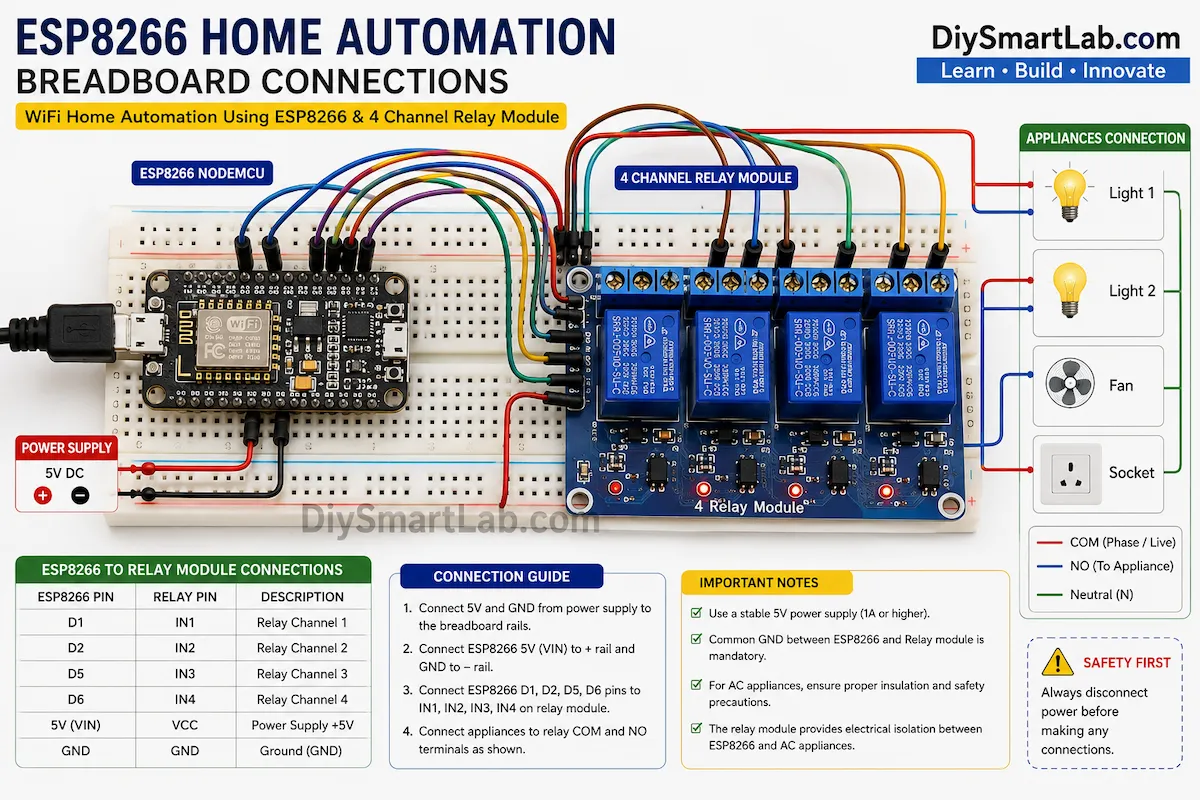
Breadboard Wiring Setup
For initial testing, it is recommended to build the circuit on a breadboard.
This allows you to verify the wiring before connecting actual appliances.
Make sure all ground connections are common between the ESP8266 and relay module.
Installing ESP8266 Board in Arduino IDE
Before uploading the program, you must install ESP8266 board support in the Arduino IDE.
Step 1: Open Arduino IDE
Launch the Arduino IDE software on your computer.
Step 2: Open Preferences
Navigate to:
File → Preferences
Step 3: Add ESP8266 Board Manager URL
Add the following URL in the Additional Board Manager URLs field:
Step 4: Install ESP8266 Package
Go to:
Tools → Board → Boards Manager
Search for ESP8266 and install the latest package.
Step 5: Select NodeMCU Board
After installation, choose:
Tools → Board → NodeMCU 1.0 (ESP-12E Module)
Pro Tip:
Always select the correct COM port before uploading code. Otherwise, the upload process may fail.
Programming Workflow
The software workflow of the WiFi Home Automation Using ESP8266 project is straightforward.
- Connect ESP8266 to WiFi.
- Create a web server or IoT dashboard.
- Wait for user commands.
- Receive appliance control request.
- Activate corresponding relay.
- Update appliance status.
- Continue monitoring for new commands.
Smartphone Control Methods
There are several ways to control appliances using ESP8266.
1. Web Server Control
The ESP8266 creates its own web page containing ON and OFF buttons. Users simply open the page from a browser and control appliances.
2. Blynk Application
Blynk is one of the most popular IoT platforms. It allows users to create professional dashboards without extensive coding.
3. MQTT Communication
MQTT is widely used in advanced IoT systems because it is lightweight and reliable.
4. Custom Mobile Application
Developers can create custom Android or iOS applications for complete control and customization.
Most Popular Beginner Option
For beginners, a simple ESP8266 web server is the easiest solution because it requires no third-party app and works directly through a web browser.
Now that the hardware setup and software configuration are complete, the next step is understanding real-world applications, benefits, limitations, troubleshooting, and future improvements for WiFi Home Automation Using ESP8266.
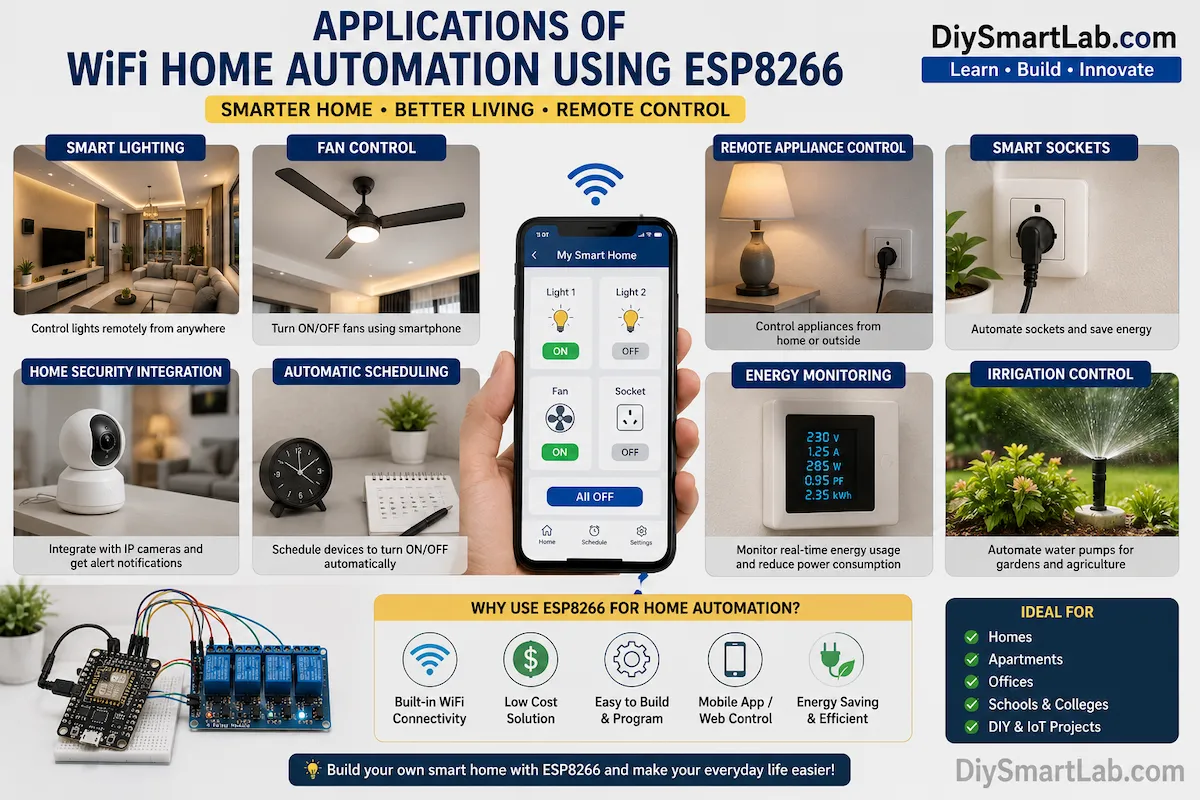
Applications of WiFi Home Automation Using ESP8266
The WiFi Home Automation Using ESP8266 project can be used in many real-world applications. Because of its flexibility and low cost, it is suitable for both home and industrial environments.
Additionally, the system can be expanded by adding sensors, timers, and cloud-based services.
Popular Applications
- Smart lighting control
- Fan control systems
- Remote appliance switching
- Smart power sockets
- Office automation systems
- Energy-saving solutions
- Garden and irrigation automation
- Smart classroom projects
- IoT learning projects
- Industrial equipment monitoring
Advantages of WiFi Home Automation Using ESP8266
There are several reasons why the ESP8266 is one of the most popular choices for home automation projects.
- Affordable hardware cost
- Built-in WiFi functionality
- Easy to program using Arduino IDE
- Compact and lightweight design
- Supports multiple appliances
- Real-time wireless control
- Large online community support
- Energy-efficient operation
- Expandable for advanced IoT projects
- Compatible with many cloud platforms
Major Benefit:
Unlike traditional automation systems, ESP8266-based home automation does not require expensive controllers. Therefore, beginners can build a smart home project on a limited budget.
Disadvantages of WiFi Home Automation Using ESP8266
Although the project offers many benefits, it also has some limitations.
- Requires a stable WiFi connection
- Limited GPIO pins compared to larger controllers
- Network failures may affect operation
- Security must be properly configured
- Relay modules add extra hardware requirements
- Power outages can interrupt automation
However, most of these limitations can be minimized through proper system design and configuration.
Future Improvements
Once the basic system is working, you can add advanced features to make your smart home even more powerful.
Advanced Upgrade Ideas
- Voice control using Google Assistant
- Amazon Alexa integration
- Mobile notifications
- Energy monitoring sensors
- Cloud-based control
- Automatic scheduling
- Motion sensor automation
- Temperature-based appliance control
- Smart security monitoring
- ESP32 upgrade for additional features
Troubleshooting Guide
Beginners often face a few common issues while building the project. Fortunately, most problems are easy to solve.
| Problem | Possible Cause | Solution |
|---|---|---|
| ESP8266 not connecting to WiFi | Wrong SSID or password | Check network credentials |
| Relay not switching | Incorrect wiring | Verify GPIO connections |
| Code upload failed | Wrong COM port | Select correct port |
| System restarting | Insufficient power | Use stable power supply |
WiFi Home Automation Using ESP8266 FAQs
Can I control appliances from my smartphone?
Yes. You can control appliances using a web browser, Blynk application, or a custom mobile app connected to the ESP8266.
Is ESP8266 suitable for beginners?
Absolutely. The ESP8266 is one of the easiest and most beginner-friendly microcontrollers for IoT and home automation projects.
How many appliances can ESP8266 control?
The number depends on the relay module and available GPIO pins. A common setup can easily control four or more appliances.
Can I use ESP8266 without Arduino?
Yes. However, Arduino IDE is the most popular and beginner-friendly development environment.
Is WiFi Home Automation Using ESP8266 safe?
Yes, when relay modules and proper electrical safety practices are used correctly.
Can I control appliances from outside my home?
Yes. By integrating cloud platforms such as Blynk, MQTT brokers, or IoT services, remote access can be enabled.
Safety Reminder:
Always isolate high-voltage AC wiring from the low-voltage ESP8266 circuit. Never touch exposed electrical connections while the system is powered.
Conclusion
WiFi Home Automation Using ESP8266 is one of the best beginner-friendly IoT projects for learning smart home technology. It combines wireless communication, real-time control, and affordable hardware into a powerful automation solution.
By using an ESP8266 NodeMCU and a relay module, you can easily control lights, fans, and other appliances directly from your smartphone. Furthermore, the project can be expanded with cloud connectivity, voice assistants, sensors, and advanced automation features.
Whether you are a student, hobbyist, or electronics enthusiast, building a WiFi Home Automation Using ESP8266 project is an excellent way to start your journey into the world of IoT.
At DiySmartLab.com, we recommend this project as one of the most practical and educational smart home projects for beginners.
You May Also Like
- What is IoT (Internet of Things)? Explained for Beginners
- ESP32 vs Arduino: Which One Should You Choose?
- Smart Irrigation System Using Soil Moisture Sensor and Arduino
- Smart Door Lock Using RFID and Arduino
- What is Arduino Uno? Features, Pin Diagram and Applications
- What is a Relay Module? Working and Arduino Usage